
So, you’ve gathered some sweet flannels, soft cottons, and pastel prints. Maybe there’s a jungle theme for your nephew, a floral design for your friend’s baby girl, or a modern rainbow pattern you just had to try. Out of all the quilting techniques, appliqué caught your eye—and now you’re both excited and a bit nervous. Totally normal!
Appliquéing baby quilts can feel overwhelming at first, but with these personalized, real-life-tested tips, you’ll feel more confident and creative throughout the process.
1. Pick the Pattern That Speaks to You
Before jumping into cutting and ironing, look over your pattern options again. Is there one that keeps drawing your eye? Go with that one. When you genuinely love the design—whether it’s playful animals, soft clouds, or cheerful balloons – you’re more likely to stick with it, even when you hit tricky spots.
2. Know Your Appliqué Method Before You Begin
Are you planning to use fusible web, iron-on freezer paper, or do hand appliqué from start to finish? If you’re unsure, test a small sample first. For example, if you want speed and clean edges, fusible web might be your best friend. If you love relaxing with a needle and thread in the evenings, hand appliqué might be your sweet spot.
3. Always Follow the Fusible Web Instructions—Exactly
Here’s a common beginner mistake: pressing the fusible web too long. It seems like more heat would help, right? But actually, too much heat can make the glue lose its stickiness. If your pieces are peeling up at the edges, go back and reread the instructions from the packaging. Trust the timing – they’ve tested it for you!
4. Don’t Let Fusible Web Make Your Quilt Stiff
You want that baby quilt to be cuddly—not feel like cardboard! When tracing your shapes onto the fusible web, cut out the centers and leave just a ¼-inch border around the edge. This keeps the appliqué secure while allowing the quilt to drape softly, which is perfect for baby snuggles and tummy time.
5. Conquer Curved Edges with These Tricks
Those tiny animal curves or rounded petals can be tricky. First, press your fabric to the freezer paper. Then, carefully trim the seam allowances down to ⅛ inch. It might feel scary to cut that small, but wider seams just get bulky and harder to shape around curves. Your appliqué will lie flatter and look more professional.
6. Use a Plastic Template for Repetitive Shapes
Making 12 identical hearts or 20 little stars? Don’t trace around a wrinkled paper pattern each time. Use template plastic (available at most craft stores) to make a durable shape that you can reuse. It saves time and gives you clean, consistent results. Tip: label your templates so you don’t mix up sizes from different projects.
7. Be Gentle When Removing Freezer Paper
When you’re ready to remove the freezer paper from behind your stitched shape, you’ve got two options. The traditional way is to carefully cut the backing fabric, leaving a ¼-inch seam allowance. But if you’d rather not cut into your quilt top, snip a small diagonal slit in the back and gently pull the freezer paper out. No fraying, and your background stays intact.
8. Try Both Hand Appliqué Stitching Styles
You’ll hear quilters talk about the “mountain” vs. the “valley.” These simply describe where your needle goes—either over the top fold (mountain) or tucked into the bottom edge (valley). Try both on a test piece. Some quilters love the control of valley stitching; others like the speed of the mountain method. Let comfort and appearance guide you.
9. Change Your Needle—More Often Than You Think
If your stitches start dragging or snagging, it’s probably time for a new needle. Especially with soft, delicate fabrics like baby flannel or lightweight cotton, a fresh sharp needle makes a big difference. For hand appliqué, a size 9 or 10 appliqué or milliner needle usually works well.
10. Stay Organized With Zip Bags or a Travel Box
If you like to sew on the go (maybe during soccer practice or on a quiet weekend at the cabin), keep each appliqué block in its own resealable bag. Include the fabric pieces, threads, needles, and any notes you’ve made. A small projct box or tote works too—bonus points if it has a little pin cushion or thread cutter inside!
Final Encouragement
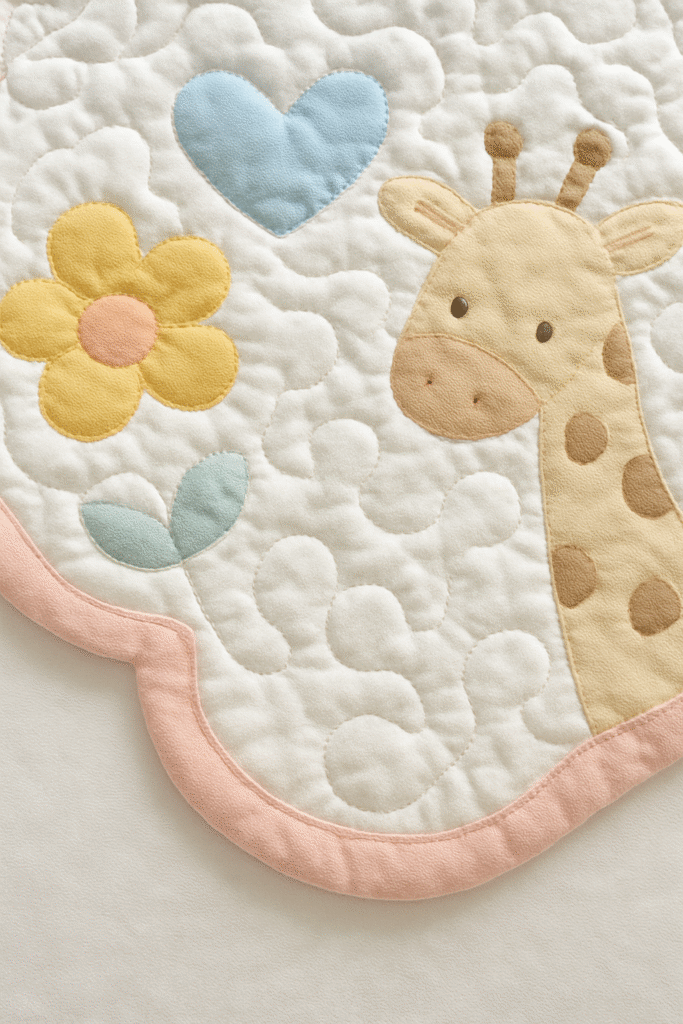
Remember, this is more than just stitching fabric – you’re creating something filled with love, imagination, and warmth. Mistakes will happen, threads will tangle, and shapes might not be perfect. But when that finished baby quilt is wrapped around a giggling little one, no one will care that the giraffe’s ear is a bit wonky. They’ll just feel the love you stitched into every seam.